© Alex van Rooijen, Bart Grootendorst, Paul Zandbergen and Harry
Broeders.
In the following explanation an example of a LED component is used. This Borland C++ Builder example uses the VCL framework to create the led window. All of the code in this document is specific for Borland C++ Builder.
The source code of this LED component is included with the CDK
You have to follow fifteen steps to create a component, these steps are:
Impcomponent
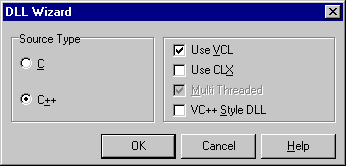
Open the DLL-wizard.

Save this project (Menu: File, Save Project As...) as ledcode.cpp and led.bpr.
The next step is creating a new form on which our new component is created. To create a new form in Builder 5.0 choose File, New Form and in Builder 6.0 choose File, New, Form. In our example the only objects that are placed on the form are an image, an actionlist and a popup menu. The form should now look like this:
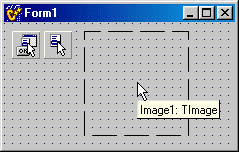
There are some properties that have to be changed using the object inspector.
Form1::Caption=""Form1::BorderIcons=[]biXXX properties to false.
Form1::BorderStyle=bsNone Form1::ClientWidth=104Form1::ClientHeight=104Form1::PopupMenu=PopupMenu1Image1::Stretch=true Image1::Align=alClient
The action list must be filled with two actions Action1 and
Action2. Later on (in step 9) the
OnExecute events are filled in. Double click the action list
icon to open the action list editor.
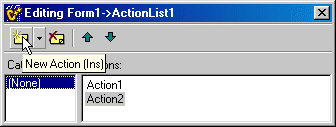
The following properties have to be changed using the object inspector.
Action1::Caption=&Connect
Action2::Caption=&Toggle
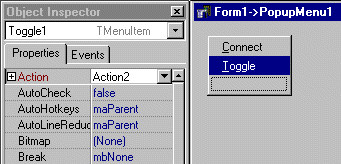
The popup menu must have two menu items. Double click the popup menu icon
to open the menu editor. Select Action1 for the first menu item's
Action property and Action2 for the second menu
item's Action property.
Now save this form as Unit1 with Menu:File, Save.
ImpComponent.
Delete the complete contents of ledcode.cpp. Every component you want to
make must be derived from the ImpComponent class. This will
give the following class declaration for our led example.
class LED: public ImpComponent {
public:
	LED();
private:
};
The class ImpComponent is defined in the CDK header file
com_server.h. Later we want to use Unit1.h so include this file as well.
#include "C:\Program Files\THRSim11\cdk\include\com_server.h"
#include "Unit1.h"
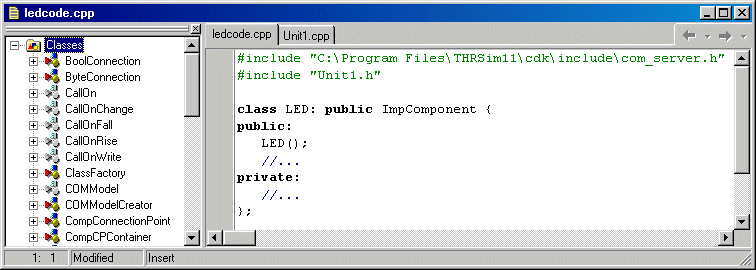
You need to add pins to your component so it can interact with the THRSim11. There are four types of connection pin classes available. Each class can be used to create an input or an output pin:
| CONNECTION | TYPE | Win32 TYPE | CDK TYPE |
|---|---|---|---|
BoolConnection |
1 bit connection | BOOL |
BoolConnection::BaseType |
ByteConnection |
8 bit connection | BYTE |
ByteConnection::BaseType |
WordConnection |
16 bits connection | WORD |
WordConnection::BaseType |
LongConnection |
32 bits connection | LONG |
LongConnection::BaseType |
These classes have two public memberfunctions to set and determine the state of the pin:
get() - Returns the current state of the pin. The return
type is dependent on the pintype, see table.
set(x) - Gives the pin a new state x. The parameter
type is dependent on the pintype, see table.
The Win32 types BOOL, BYTE, WORD and
LONG are defined in the "standard" Win32 include file vcl.h.
For your convenience we defined the typename BaseType in each
of the four connection classes. E.g. the return type for
BoolConnection::get() is BoolConnection::BaseType
(which is a typedef for the Win32 type BOOL).
You must add the connection pins as (private) data members to the class derived
from ImpComponent. In our led example we need only one
BoolConnection pin named pin,
class LED: public ImpComponent {
public:
	LED();
private:
	BoolConnection pin;
};
};
After you have declared the component connection pins, they must be made
available for the THRSim11. This is done with the Expose function.
This function takes two parameters, the pin to expose and the user friendly
name of that pin. The user friendly name is used in the connection dialog.
The constructor of your component has to call the Expose function
for each connection pin as shown below for our led example.
LED::LED() {
	Expose(pin, "Led input");
}
With a third parameter (in string format) it's possible to define a pin within the THRSim11 to which the specified component pin prefers to connect. The THRSim11 will try to connect these pins together. This could look like this:
LED::LED() {
	Expose(pin, "Led input", "PB0");
}
}
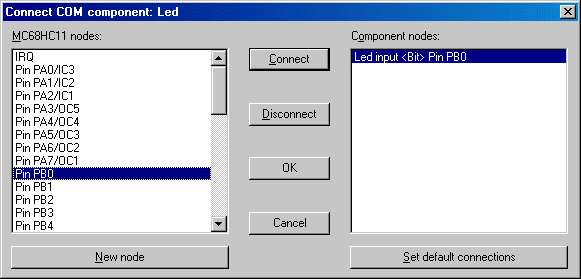
In this case the "led input" pin for the led is by default connected to pin "PB0" of the simulated 68HC11.
Here you see the connect dialog box which is opened when you select connect in the pop-up menu or when you don't define a default pin for the led component in THRSim11:
The next step is to notify the component when the input is changed so the
led's picture can be set accordingly, this is done with the function
pinChanged described in the next chapter. There are four
CallOnxxxxx templates that can be used:
CallOnWrite - Notifies whenever is written to the pin
even when this means the state isn't changed.
CallOnChange - Notifies when pin is changed.
CallOnRise - Notifies when pin rises.
CallOnFall - Notifies when pin falls.
For each pin you want to use as an input you need to include at least one
CallOnxxxxx template (where xxxxx
is the desired notification) as a private member of the class that must react
on an input change. The use of multiple (different)
CallOnxxxxx templates on one pin is allowed. It's also
allowed that different CallOnxxxxx templates call different
component behavior functions.
You also need to initialize these templates in the constructor of the class.
All constructors of CallOnxxxxx classes need the same
three parameters:
this pointer).
All memberfunctions of the connection pin monitored by a
CallOnxxxxx template, are also available in the
CallOnxxxxx that monitors it. So if you want to call
the get function of a connection pin you can also make this
call via the CallOnxxxxx object that monitors it. The
CallOnxxxxx object behaves like a pointer to the pin
which is monitored. So if a CallOnxxxxx object is named
coc1 then the value of the pin can be obtained by:
value = coc1->get();
Our led example uses one input pin, we want to call the behavior function
pinChanged only when the state of the pin changes. We first
have to add a CallOnChange object as member of the class derived
from TForm, as shown below (file: Unit1.h):
//... #include "C:\Program Files\THRSim11\cdk\include\com_server.h"//... class TForm1: public TForm { //... private: CallOnChange<BoolConnection::BaseType, TForm1> coc;
ImpComponent* pComp;
void pinChanged();
public: __fastcall TForm1(HWND parentWindow, ImpComponent* pcomp, BoolConnection& pin);
};
Because we want to change the image when the state of the pin changes the
function pinChanged must be a member of TForm1.
Otherwise we wouldn't have access to the pictures which will be private parts
of TForm1. So we have to initialize this handler en pin in the
constructor of our form. The constructor now should look like this (file:
Unit1.cpp):
__fastcall TForm1::TForm1(HWND parentWindow, ImpComponent* pcomp, BoolConnection& pin):
		TForm(parentWindow),
		coc(pin, this, &TForm1::pinChanged),
		pComp(pcomp) {
}
Every time the pin changes we want to change the image as well. We do this
with the function pinChanged, this is a void function,
see the private section of the class of TForm1 above. However
there is more to do in order to accomplish our desired change of pictures.
The following steps should be carried out.
 |
 |
| ledon.bmp | ledoff.bmp |
| ledon.ico | ledoff.ico |
ledOff BITMAP"ledoff.bmp"ledOn BITMAP"ledon.bmp"iconLedOff ICON"ledoff.ico"iconLedOn ICON"ledon.ico"
Note that the first word is the name the picture is known by in the application, the second word is the type and the third word is the filename(path). This file now can be simply saved as led.rc
TForm1.
#include <Graphics.hpp>//... class TForm1: public TForm { //... private: CallOnChange<BoolConnection::BaseType, TForm1> coc; ImpComponent* pComp; void pinChanged(); Graphics::TBitmap* BitmapOff;
Graphics::TBitmap* BitmapOn;
HICON HIconOff;
HICON HIconOn;
public: __fastcall TForm1(HWND parentWindow, Impcomponent* pcomp, BoolConnection& pin); __fastcall ~TForm1();
};
second we initialize them in the constructor and we also load the pictures from the resource.
__fastcall TForm1::TForm1(HWND parentWindow, ImpComponent* pcomp, BoolConnection& pin): TForm(parentWindow), coc(pin, this, &TForm1::pinChanged), pComp(pcomp), BitmapOff(new Graphics::TBitmap()),BitmapOn(new Graphics::TBitmap()),
HIconOff(::LoadIcon(HInstance, "iconLedOff")),
HIconOn(::LoadIcon(HInstance, "iconLedOn")) {
BitmapOff->LoadFromResourceName((unsigned int)HInstance, "ledOff");
BitmapOn->LoadFromResourceName((unsigned int)HInstance, "ledOn");
}
BitmapOff and BitmapOn) are deleted
in the destructor ~TForm1.
__fastcall TForm1::~TForm1() {
    	delete BitmapOff;
	delete BitmapOn;
}
Now all we have to define is what exactly happens in the function
pinChanged. You're free to use multiple functions to describe
the behavior of a component. Every pin may have it's own behavior function.
In this example there is only one pin so there is only one function needed.
void TForm1::pinChanged() {
	//	Set the icon of the window every time the pin changes.
	pComp->SetCompWinIcon(coc->get() ? HIconOn : HIconOff);
	//	Set the title of the window every time the pin changes.
	pComp->SetCompWinTitle(coc->get() ? "Led is ON" : "Led is OFF");
	//	Set the image of the led every time the pin changes.
	Image1->Picture->Assign(coc->get() ? BitmapOn : BitmapOff);
	//	Redraw the picture
	Image1->Invalidate();
}
This function should also be called on creating the form, this can be done
with the OnCreate event of Form1.
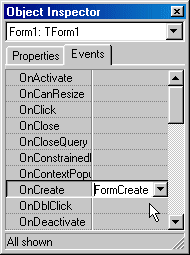
The code is as follows:
void __fastcall TForm1::FormCreate(TObject*) {
	pinChanged();
}
The action list has 2 actions: Action1 with caption &Connect,
and Action2 with caption &Toggle. You must define the
OnExecute events for these actions.
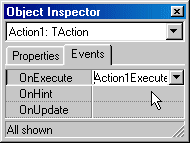
The code is as follows:
void __fastcall TForm1::Action1Execute(TObject*) {
	 pComp->ConnectDialog();
}

void __fastcall TForm1::Action2Execute(TObject*) {
	coc->set(!coc->get());
}
This last function reads the current setting (on or off), inverts it and
sets the pin to its new setting. Now that we have created a popupmenu, it
is time we tell our form where we want this menu to be accessed. This is
of course at the main form. So select your form and change the
Form1::PopupmMenu property to PopupMenu1.
To give your component a name you have to call the void
SetComponentName(const char* name) function in the constructor
of the class derived from ImpComponent. This name is used in
the pulldown Connect menu of the THRSim11 and will also be the default
window title. If you want to sort components in sub menus within the
Connect menu you can also provide a groupname. This is a new
feature in CDK version 3.0 and you need THRSim11 version 3.30 or higher
to use it. To place your component in a submenu you have to call
the void SetGroupname(const char*
groupname) function in the constructor of your component. For
our led example this will give the following constructor:
LED::LED() {
	SetComponentName("Led");
	SetGroupName("CDK C++ Builder 6.0 Examples");
	Expose(pin, "Led input", "PB0");
}
To link the form to your component you have to override the HWND
CreateComponentWindow(HWND parent) virtual memberfunction of the
ImpComponent class. Within this function you need to create
your window. The HWND parent parameter must be used as parent
window and you need to return the HWND of your just created
window. You can see the CreateComponentWindow function for our
LED example below:
class LED: public ImpComponent {
public:
	LED();
	~LED();
private:
	virtual HWND CreateComponentWindow(HWND parent);
	TForm* LEDWindow;
	BoolConnection pin;
};

//...

HWND LED::CreateComponentWindow(HWND parent) {
	if (LEDWindow==0) {
		LEDWindow = new TForm1(parent, this, pin);
		// LEDWindow must be deleted in the destructor ~LED()!
		LEDWindow->Show();
	}
	return LEDWindow->Handle;
}
In this function it is checked if the window is already created. The
LEDWindow pointer is must be initialized to 0 in
the constructor:
LED::LED(): LEDWindow(0) {
	SetComponentName("Led");
	SetGroupName("CDK C++ Builder 6.0 Examples");
	Expose(pin, "Led input","PB0");
}
Don't forget to delete LEDWindow in the destructor
~LED:
LED::~LED() {
	delete LEDWindow;
}
At this point the source of your component is almost ready, there are only two COM related things left to do. The first is to generate a GUID and put this in the sourcefile. A GUID (Global Unique Identifier) is a unique number that identifies a COM component. The Borland C++ Builder GUID generator is located in: \Program Files\Borland\CBuilder6\Examples\Mfc\Utility\Guidgen (this directory contains the sources, you have to build the exe yourself). You can also download it from here: guidgen.zip. You need to include this GUID in the following format in your source file:
DEFINE_GUID(guid identifier, guid);
So in the led example we add the following line in the file ledcode.cpp:
DEFINE_GUID(CLSID_LED, 0x681299e1, 0x8bb4, 0x11d3, 0xad, 0xaa, 0x00, 0x60, 0x67, 0x49, 0x62, 0x45);
CLSID_LED is the identifier for the GUID.
The second COM related thing is to register a classfactory. A classfactory
makes it possible to create more then one object of your component. To register
the classfactory you need to insert a global function called
RegisterClassFactories() with the following source code:
void RegisterClassFactories() {
	ClassFactory* new_classfactory(new ComponentFactory<component>(guid));
	class_factories.push_back(new_classfactory);
}
You only need to replace the two bold italic words.
component needs to be replaced by the component classname (the
one derived from ImpComponent) and guid needs
to be replaced by the identifier of the GUID. For the led example this gives:
void RegisterClassFactories() {
	ClassFactory* new_classfactory(new ComponentFactory<LED>(CLSID_LED));
	class_factories.push_back(new_classfactory);
}
Your component is ready to be compiled but don't forget the following things:
com_server.h in your project, in the headerfile
(Unit.h).
link the com_server.lib. Be careful to use the correct one.
C:\Program Files\THRSim11\cdk\lib\C++Builder5.0\com_server.lib
must be used for Borland C++ Builder 4.0 or 5.0.
C:\Program Files\THRSim11\cdk\lib\C++Builder6.0\com_server.lib
must be used for Borland C++ Builder 6.0.
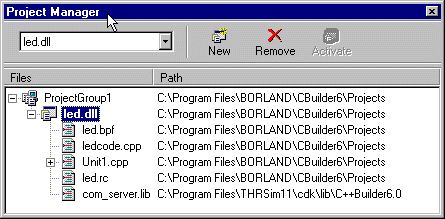
Choose Project, Build led to build the DLL. Double check that you did:
remove the file led.res from the project.
add the file com_server.lib to the project.
Before your component is ready for use, you need to do one last thing in order to let the THRSim11 detect your component. You have to add some lines to the registry which provides THRSim11 with some information about your component. The most easy way to add these lines to your registry is to make your own .REG file. You need to insert the following lines in this file:
REGEDIT
HKEY_CLASSES_ROOT\CLSID\{componentguid} = componentname
HKEY_CLASSES_ROOT\CLSID\{componentguid}\InprocServer32 = componentpath
HKEY_CLASSES_ROOT\CLSID\{componentguid}\Interface\{6b93056f-799d-11d3-adaa-006067496245} = IComponent
HKEY_CLASSES_ROOT\Interface\{6b93056f-799d-11d3-adaa-006067496245}\ProxyStubCLSID32\{componentguid} = componentname
The following bold words have to be replaced:
componentguid - Insert here the GUID you generated for
your component (see step 12).
componentname - Insert here the name of your component.
componentpath - Insert here the pathname of your
DLL. You need to specify the full pathname of the DLL in the registry.
The other words should be left unchanged. For the led example this will give the following .REG file
REGEDIT
HKEY_CLASSES_ROOT\CLSID\{681299e1-8bb4-11d3-adaa-006067496245} = LED
HKEY_CLASSES_ROOT\CLSID\{681299e1-8bb4-11d3-adaa-006067496245}\InprocServer32 = C:\Program Files\BORLAND\CBuilder6\Projects\led.dll
HKEY_CLASSES_ROOT\CLSID\{681299e1-8bb4-11d3-adaa-006067496245}\Interface\{6b93056f-799d-11d3-adaa-006067496245} = IComponent
HKEY_CLASSES_ROOT\Interface\{6b93056f-799d-11d3-adaa-006067496245}\ProxyStubCLSID32\{681299e1-8bb4-11d3-adaa-006067496245} = LED
Double click on the saved .REG file and it will be merged with your registry. When you copy the file led.dll to the directory you have registered you can use your component with THRSim11. NOTE: If you want to distribute your component you need to include the .DLL and the .REG file in the distribution package.
Tips for debugging a THRSim11 component developed with Borland C++ Builder and tips for the distribution of such a component can be found on the next page of this tutorial.
You can find the complete C++ sources here: