© Alex van Rooijen, Bart Grootendorst, and Harry Broeders.
![]() In
the following explanation an example of an exor component is used. The source
code of this exor component is included with the CDK:
In
the following explanation an example of an exor component is used. The source
code of this exor component is included with the CDK:
The code for the component must be placed in a dynamic link library (dll). We presume that you know how to create a dll with the compiler you use. Here is a quick reminder.
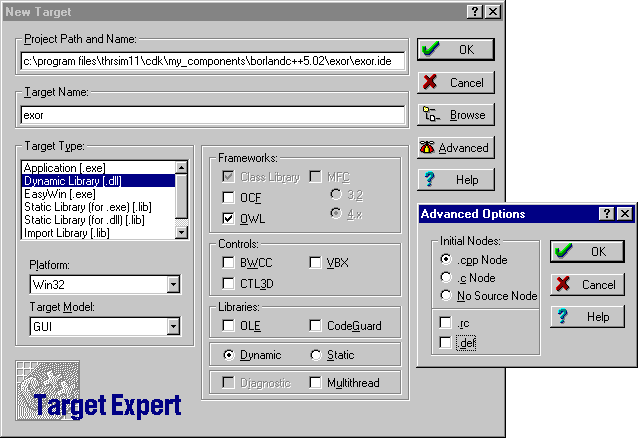
The project manager will be opened now. Double click the exor.cpp document
in the project window and you are ready to start typing the code for your
component.
.
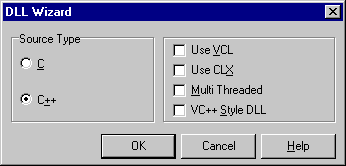
The file Unit1.cpp will be opened in the editor. Choose Save Project
As... browse to the directory you want to store your component and save Unit1.cpp
as exorcode.cpp. You are automatically prompted to save Project1.bpr. Delete
the complete contents of exorcode.cpp and you are ready to start typing the
code for your component.
.
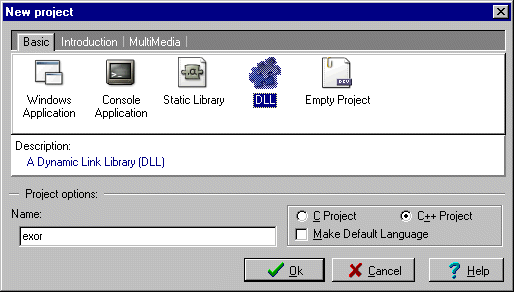
When you click Ok you can browse to the directory you want to store
your component and save exor.dev. Choose Project, Remove from
Project and remove dll.h from the project. Choose File, Save
As... and save dllmain.cpp as exor.cpp. Delete the complete contents
of exor.cpp and you are ready to start typing the code for your
component.
.
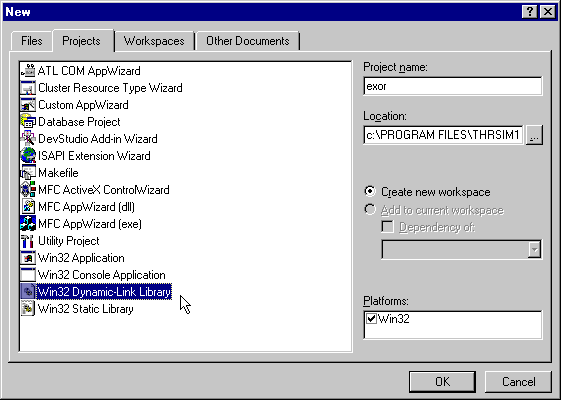
You are given some choices now. Choose An empty DLL project and click the Finish button. Choose Project, Add To Project, New... select C++ Source File and type in the File name: exor and you are ready to start typing the code for your component.
You have to follow ten steps to create a component, these steps are:
ImpComponent
For those who are not familiar with the exor: the exor (exclusive or) is a well known component in digital technology. An exor has two boolean inputs and one boolean output. It has the following symbol and truthtable:
 |
in1 | in2 | out |
|---|---|---|---|
| 0 | 0 | 0 | |
| 0 | 1 | 1 | |
| 1 | 0 | 1 | |
| 1 | 1 | 0 |
ImpComponent.
Every component you want to make must be derived from the
ImpComponent class. This will give the following class declaration
for our exor example.
class Exor: public ImpComponent {
public:
	Exor();
	...
private:
	...
};
You need to add pins to your component so it can interact with the THRSim11. There are four types of connection pin classes available. Each class can be used to create an input or an output pin:
| CONNECTION | TYPE | Win32 TYPE | CDK TYPE |
|---|---|---|---|
BoolConnection |
1 bit connection | BOOL |
BoolConnection::BaseType |
ByteConnection |
8 bit connection | BYTE |
ByteConnection::BaseType |
WordConnection |
16 bits connection | WORD |
WordConnection::BaseType |
LongConnection |
32 bits connection | LONG |
LongConnection::BaseType |
These classes have two public memberfunctions to set and determine the state of the pin:
get() - Returns the current state of the pin. The return
type is dependent on the pintype, see table.
set(x) - Gives the pin a new state x. The parameter
type is dependent on the pintype, see table.
The Win32 types BOOL, BYTE, WORD and
LONG are defined in the "standard" Win32 include file windef.h.
For your convenience we defined the typename BaseType in each
of the four connection classes. E.g. the return type for
BoolConnection::get() is BoolConnection::BaseType
(which is a typedef for the Win32 type BOOL).
You must add the connection pins as (private) data members to the class derived
from ImpComponent. In our exor example we need three
BoolConnection pins named in1, in2,
and out.
class Exor: public ImpComponent {
public:
	Exor();
	...
private:
	BoolConnection in1, in2, out;
	...
};
After you have declared the component connection pins, they must be made
available for the THRSim11. This is done with the Expose function.
This function takes two parameters, the pin to expose and the user friendly
name of that pin. The user friendly name is used in the connection dialog.
The constructor of your component has to call the Expose function
for each connection pin as shown below for our exor example.
Exor::Exor() : ... {
	...
	Expose(in1, "Input 1");
	Expose(in2, "Input 2");
	Expose(out, "Output");
}
With a third parameter (in string format) it's possible to define a pin within
the THRSim11 to which the specified component pin prefers to connect. The
THRSim11 will try to connect these pins together.
Here you see the connect dialog box which is opened when you create an exor
component in THRSim11:

If you provide prefered conncetions e.g.:
Exor::Exor() : ... {
	...
	Expose(in1, "Input 1", "PC0");
	Expose(in2, "Input 2", "PC1");
	Expose(out, "Output", "PB0");
}
}
The connect dialog is not opened when you create a exor component in THRSim11 but the defined connections are mode.
Now you have a component with pins, but how can you give the component a
behaviour? Well you just have to add a (private) memberfunction to the class
derived from ImpComponent. The name of this memberfunction is
yours to choose.
Let's see how this is done with the exor. The behaviour of an exor is easy
to define. We just have to read the states of both input pins and set the
output pin based on these states. This is done in the
inputChanged function as shown below.
class Exor: public ImpComponent {
public:
	Exor();
	void inputChanged();
private:
	BoolConnection in1, in2, out;
	...
};
void Exor::inputChanged() {
	out.set(in1.get()&&!in2.get() || !in1.get()&&in2.get());
}
You're free to use multiple functions to describe the behaviour of a component.
The next step is to notify the component when one of the inputs is changed
so the output pin(s) can be set accordingly using the previously written
function(s). There are four CallOnxxxxx templates that
do this:
CallOnWrite - Notifies whenever is written to the pin
even when this means the state isn't changed.
CallOnChange - Notifies when pin is changed.
CallOnRise - Notifies when pin rises.
CallOnFall - Notifies when pin falls.
For each pin you want to use as an input you need to include at least one
CallOnxxxxx template (where xxxxx
is the desired notification) as a private member of the class derived from
ImpComponent. The use of multiple (different)
CallOnxxxxx templates on one pin is allowed. It's also
allowed that different CallOnxxxxx templates call different
component behaviour functions.
You also need to initialize these templates in the constructor of the class
derived from ImpComponent. All constructors of
CallOnxxxxx classes need the same three parameters:
this pointer).
All memberfunctions of the connection pin monitored by a
CallOnxxxxx template, are also available in the
CallOnxxxxx that monitors it. So if you want to call
the get function of a connection pin you can also make this
call via the CallOnxxxxx object that monitors it. The
CallOnxxxxx object behaves like a pointer to the pin
which is monitored. So if a CallOnxxxxx object is named
coc1 then the value of the pin can be obtained by:
value = coc1->get();
Our exor example uses two input pins, both want to call the same component
behaviour function and only when the state of the pins changes. We first
have to add two CallOnChange objects as members of the class
derived from ImpComponent, as shown below:
class Exor: public ImpComponent {
public:
	Exor();
	void inputChanged();
private:
	BoolConnection in1, in2, out;
	CallOnChange<BoolConnection::BaseType, Exor>  coc1, coc2;
};
};
As said before it is also necessary to initialize the
CallOnChange objects:
Exor::Exor(): coc1(in1, this, &Exor::inputChanged), coc2(in2, this, &Exor::inputChanged) {
	...
	Expose(in1, "Input 1");
	Expose(in2, "Input 2");
	Expose(out, "Output");
}
To give your component a name you have to call the
void SetComponentName(const char* name) function
in the constructor of the class derived from ImpComponent. This
name is used in the pulldown Connect menu of the THRSim11 and will also be
the default window title. If you want to sort components in submenus within
the Connect menu you can also provide a groupname. This is a new feature
in CDK version 3.0 and you need THRSim11 version 3.30 or higher to use it.
To place your component in a submenu called groupname you have
to call the void SetGroupname(const char* groupname)
function in the constructor of your component. For our exor example
this will give the following constructor:
Exor::Exor(): coc1(in1, this, &Exor::inputChanged), coc2(in2, this, &Exor::inputChanged) {
	SetComponentName("Exor");
	SetGroupName("CDK Examples");
	Expose(in1, "Input 1");
	Expose(in2, "Input 2");
	Expose(out, "Output");
}
At this point the source of your component is almost ready, there are only two COM related things left to do. The first is to generate a GUID and put this in the sourcefile. A GUID (Global Unique Identifier) is a unique number that identifies a COM component. A GUID generator can be downloaded here: guidgen.zip and is also included with any of the supported compilers:
You need to include this GUID in the following format in your source file:
DEFINE_GUID(guid identifier, guid);
And in the exor example:
DEFINE_GUID(CLSID_EXOR,0x681299e0,0x8bb4,0x11d3,0xad,0xaa,0x00,0x60,0x67,0x49,0x62,0x45);
CLSID_EXOR is the identifier for the GUID.
The second COM related thing is to register a classfactory. A classfactory
makes it possible to create more then one object of your component. To register
the classfactory you need to insert a global function called
RegisterClassFactories() with the following source code:
void RegisterClassFactories() {
	ClassFactory* new_classfactory(new ComponentFactory<component>(guid));
	class_factories.push_back(new_classfactory);
}
You only need to replace the two bold italic words.
component needs to be replaced by the component classname (the
one derived from ImpComponent) and guid needs
to be replaced by the identifier of the GUID. For the exor example this gives:
void RegisterClassFactories() {
	ClassFactory* new_classfactory(new ComponentFactory<Exor>(CLSID_EXOR)); // Does not work for Visual C++
	class_factories.push_back(new_classfactory);
}
This standard C++ code doesn't compile with Visual C++. The initialization of the pointer using brackets is misunderstood by VC++6.0. You have to use the older initialization using the assignment operator to initialize the pointer:
void RegisterClassFactories() {
	ClassFactory* new_classfactory=new ComponentFactory<Exor>(CLSID_EXOR); // Old-fashioned but works fine for Visual C++
	class_factories.push_back(new_classfactory);
}
Your component is ready to be compiled but don't forget the following things:
com_server.h#include "C:\Program Files\THRSim11\cdk\include\com_server.h"
;c:\program files\thrsim11\cdk\include.def extension) to the directory where you
saved the project. The purpose of this file is to export two functions from
the DLL. See
../examples/Dev-C++5/exor/exor.def or
../examples/VisualC++6.0/exor/exor.def
for an example.
com_server.lib. Be careful to use the correct one.
Each compiler uses a different OBJ format so there are severall libraries
provided:
C:\Program
	Files\THRSim11\cdk\lib\BorlandC++5.02\com_server.lib
C:\Program Files\THRSim11\cdk\lib\C++Builder5.0\com_server.lib
C:\Program Files\THRSim11\cdk\lib\C++Builder6.0\com_server.lib
C:\Program Files\THRSim11\cdk\lib\Dev-C++5\com_server.a-luuid
-lole32
--def exor.def
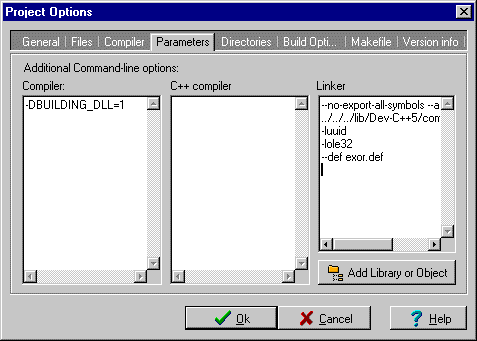
.
C:\Program
Files\THRSim11\cdk\lib\VisualC++6.0\com_server.libled.def
Before your component is ready for use, you need to do one last thing in order to let the THRSim11 detect your component. You have to add some lines to the registry which provides the THRSim11 with some information about your component. The most easy way to add these lines to your registry is to make your own .REG file. You need to insert the following lines in this file:
REGEDIT
HKEY_CLASSES_ROOT\CLSID\{componentguid} = componentname
HKEY_CLASSES_ROOT\CLSID\{componentguid}\InprocServer32 = componentpath
HKEY_CLASSES_ROOT\CLSID\{componentguid}\Interface\{6b93056f-799d-11d3-adaa-006067496245} = IComponent
HKEY_CLASSES_ROOT\Interface\{6b93056f-799d-11d3-adaa-006067496245}\ProxyStubCLSID32\{componentguid} = componentname
The following bold words have to be replaced:
componentguid - Insert here the GUID you generated for
your component (see step 5).
componentname - Insert here the name of your component.
componentpath - Insert here the pathname of your
DLL. You need to specify the full pathname of the DLL in the registry.
The other words should be left unchanged. For the exor example for Borland C++ 5.02 this will give the following .REG file (exor.reg):
REGEDIT
HKEY_CLASSES_ROOT\CLSID\{681299e0-8bb4-11d3-adaa-006067496245} = EXOR
HKEY_CLASSES_ROOT\CLSID\{681299e0-8bb4-11d3-adaa-006067496245}\InprocServer32 = C:\Program Files\THRSim11\CDK\examples\BorlandC++5.02\exor\exor.dll
HKEY_CLASSES_ROOT\CLSID\{681299e0-8bb4-11d3-adaa-006067496245}\Interface\{6b93056f-799d-11d3-adaa-006067496245} = IComponent
HKEY_CLASSES_ROOT\Interface\{6b93056f-799d-11d3-adaa-006067496245}\ProxyStubCLSID32\{681299e0-8bb4-11d3-adaa-006067496245} = EXOR
Double click on the saved .REG file and it will be merged with your registry. When you copy the file exor.dll to the directory you have registered you can use your component with THRSim11.
NOTE: If you want to distribute your component you need to include the .DLL and the .REG file in the distribution package.
You can find the complete C++ sources here: