Back to the THRSim11 home page ...
Copyright © 2005 Arjan Besjis, Harry Broeders. Version 5.30 March
2005
What else is new in version 5.30 ?
 Programming microcontrollers
using a high level language is becoming more popular every day. It has a
lot of advantages over programming with assembly:
Programming microcontrollers
using a high level language is becoming more popular every day. It has a
lot of advantages over programming with assembly:
Of course there's also a down side to high level language programming of microcontrollers and that's the loss of speed and efficiency. Most of the time though, this is not a problem for most of the application. The GNU Development chain for the Motorola 68HC11 is available since 1999. This includes a C/C++ compiler (gcc) for the 68HC11. THRSim11 can be used to debug the programs that gcc creates. You can step through the code, watch the variables change while the program is running and a lot more! The program can be downloaded here free of charge.
 Compile and debug a C
program using GNU gcc and THRSim11.
Compile and debug a C
program using GNU gcc and THRSim11.
More information about the GNU gcc compiler can be found here.
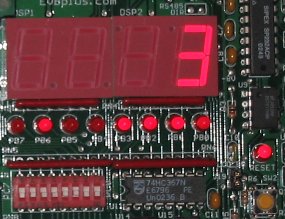
This tutorial is an episode in the live of the 68HC11 programmer named Kevin. Kevin uses THRSim11 to simulate and debug his programs. He has just bought himself a fantastic target board, the EVBPlus2. This board has 4 7-segments displays and Kevin wants to use those displays to show a temperature value. Kevin likes to start simple so the first program just makes one display count from 0 to 9 (like the display on the right).
If you want to follow this tutorial step-by-step en try everything for yourself, you need the same tools as Kevin has. Don't worry; you don't actually need an EVBPlus2 (although its a great board!). In this tutorial Kevin will only build his program and debug it using THRSim11 (after all this is the tutorial for the debugger). So...
download
the free THRSim11 now!
![]() (13.2
MB)
(13.2
MB)
and 'double click it' to install the program. The install program will tell you what you need to know (and ask you what it needs to know). Then start the program via:
![]()
In the time you read the previous paragraph, Kevin has written his "one display counter" program and is ready to give it a first test run in the simulator. He wrote it with an editor called SciTE. A version of SciTE configured to be used with THRSim11 and gcc is installed with THRSim11. You can open his program by selecting '../examples/7SegmentsDisplay/7SegmentsDisplay' in the 'File' menu. If you're wondering how it got there (since Kevin has just written it)... don't. SciTE will open and display the source. The source can also be viewed in THRSim11 but without syntax coloring.
Compile the program.In the 'Tools' menu, Kevin selects 'Go'. This will let gcc compile the "one display counter" program and open it in THRSim11. Scite has been configured to 'Compile' or 'Build' too, but only 'Go' will open THRSim11. |
 |
The list window.
Kevin is thrilled to see that his program compiled without errors. THRSim11
opens it in the C/C++ list window. The entire source
is visible in this window and the green line indicates that the PC (program
counter) is on the start of function
Kevin likes this list window but likes the variables window even more. |
 |
The variables window.In the C/C++ variables window all the variables of the program are visible.When a variable is out of scope it is displayed with a gray color and these out of scope variables will not be updated. When you (or Kevin) run the program (F9), the variables will change while running. In this window you can (among other things):
|
Simple view of C variables. -
C variables with types and locations shown. |
 Connect the display.
Kevin is ready to push F9 to run the program, but first he connects his 7-segments display. How else is he supposed to see if his program works? He does this by selecting 'Connect | 7-Segments Displays | 7-Segments Display'. A 7-segments display opens.
Kevin rearranged some windows, placed a breakpoint, and ran the simulator a few times. His screen now looks like this:
You can read here how Keven managed to run this program on his EVB2Plus2 board.
As it turns out, Kevin is a fine programmer. He doesn't need the debugger of THRSim11. The program was flawless, perfect, supreme. There's no bug to be found. If this never happens to you, while you're programming you're 68HC11 in C, then maybe you do need THRSim11?
More information about the GNU as assembler can be found here.
THRSim11 has its own build in assembler called THRAss11. THRAss11 is largly compatible with AS11 (the freeware assembler from Motorola).
The internal assembler THRAss11 is an absolute assembler. This means that
you have to provide the addresses where the program and data are to be located
in the assembler source code (using the ORG directive). The
GNU assembler
as is a relocatable assembler. This means that you need a linker
(the GNU linker
ld)) to generate executable code and you need to provide a
linker script to
define the addresses where the program and data are to be located in memory.
THRAss11 is much simpler then GNU as and is therefore recommended for programmers starting to learn 68HC11 assembler programming. THRAss11 has also better error diagnostics and is compatible with AS11. GNU as has many more features than THRAss11 and is therefore recommended for more experienced 68HC11 assembler programmers. If you want to combine (link) C/C++ code with assembler code you also need to use GNU as.
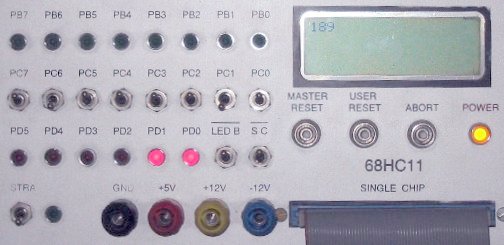
The program used here as an example calculates the decimal value (in ASCII code) of an 8 bits unsigned binary number present at external pins PC7 to PC0. The result will be displayed on the LCD display of the I/O box of THRSim11. Each conversion is triggered by a rising edge of the Strobe A pin. The program uses the IRQ interrupt. The number of interrupt are counted in the global variabele count.
You can open the example program by selecting '../examples/GNU as example/hc11prog.s' in the 'File' menu. The source code will be loaded in SciTE or in any other editor you configured. A version of SciTE configured to be used with THRSim11 and GNU as is installed with THRSim11. If you use SciTE you can just press F5 to assemble the program and load it into THRSim11. If you use the internal editor of THRSim11 you can press Ctrl+A to assemble the program and load it. THRSim11 opens the assembled code into the so called C/C++ List Window. This window is called this way because most people use the GNU 68HC11 tool chain to develop C/C++ programs.
The entire assembler source is visible in this window and the green line
indicates that the PC (program counter) is on the start of the program at
label main. The startup code which is automatically linked with
your code by the GNU
ld linker has already run. In the List Window you can (among other
things):
To see the effect of this program you have to open the I/O Box of THRSim11 using the View, I/O Box menu item.
Each time you switch on the STRA switch the irqisr interrupt
service routine is called. This interrupt routine reads the latched C port
value, converts it to ASCII code, and displays it on the LCD. The number
of interrupts is counted in the global variable count. You can
view this variable in the Memory List Window. Choose menu item View,
Memory, Memory List... and type count for the
starting address of the Memory List.
 This
will open the Memory List Window on the appropriate address. The label
This
will open the Memory List Window on the appropriate address. The label
RAM0 is a standard THRSim11 label (RAM0 is the
starting address of the first portion of RAM in the memory map).
Because the reset vector is set to the starting address of the startup code
(address _start) you can reset the 68HC11 while running. Use
the menu item Execute, Reset 68HC11 to reset the simulated
microcontroller. You can see that the startup code resets the global variabele
count to zero.
When you have access to a real 68HC11 EVM board with an addational LCD (like I do) you can also run this program on real hardware. Select the List Window and press Ctrl+D to download the program. This opens the so called Target C/C++ List Window. This window is called this way because most people use the GNU 68HC11 tool chain to develop C/C++ programs.
In this Target List Window you can (among other things):
Here is a picture of the program running on the 68HC11 EVM:
 You can use
the "New GNU gcc or as source..." menu item from the
File menu to create your own GNU gcc or as source file.
An appropiate makefile and ld script is also created if needed.
You can use
the "New GNU gcc or as source..." menu item from the
File menu to create your own GNU gcc or as source file.
An appropiate makefile and ld script is also created if needed.
Information about the GNU tools can be found using the following links:
Each 68HC11 executable program developed with the GNU development chain can
exist of many source files. The building of the executable program is controlled
by the GNU utility make via a file called makefile. This
file describes the relationships between the different source files and also
describes the action which need to be taken to build the executable. It is
traditional to call the executable program a.out. All source
files needed to build one 68HC11 executable are normally placed in a separate
directory.
THRSim11 can creates a simple 68HC11 executable program excisting of: one source file, a makefile, and a linker script. You can add more sourcefiles to the makefile in a very easy way later.
 In the C/C++ List Window all the source of the program is visible.
When this window is selected, you can:
In the C/C++ List Window all the source of the program is visible.
When this window is selected, you can:
 In the C/C++ Variables Window all
the variables of the program are visible. When a variable is out of scope
it is displayed with a gray color and the variable will not be updated. When
a variable is in scope the location of the variable can be made visible.
Click your right mouse botton somewhere in the window and choose the popup
menu item: "Show Locations". The location (memory address or register
name) of each variabele will be visible after the
In the C/C++ Variables Window all
the variables of the program are visible. When a variable is out of scope
it is displayed with a gray color and the variable will not be updated. When
a variable is in scope the location of the variable can be made visible.
Click your right mouse botton somewhere in the window and choose the popup
menu item: "Show Locations". The location (memory address or register
name) of each variabele will be visible after the @ character.
When you tell your compiler to optimize your code, then the compiler may
leave variables out of the code. These variables are in your source but not
in the code. They are indicated with the address @---- and the
value -- (for a one byte variable). In this window you can:
 When you want to run the
7SegmentsDisplay.c program on your target board using the demo version of
THRSim11 you have to adjust the memory map defined in demo.ld. When you use
a licensed version you might also have to adjust the memory map defined in
evb.ld
When you want to run the
7SegmentsDisplay.c program on your target board using the demo version of
THRSim11 you have to adjust the memory map defined in demo.ld. When you use
a licensed version you might also have to adjust the memory map defined in
evb.ld
To run the program on, for example, the EVBPlus2 board you have to make the following changes (shown in bold) in demo.ld if you use the DEMO version of THRSim11. If you use a license version of THRSim11 there is no need to change the file evb.ld.
MEMORY
{
  ram    (rwx) : ORIGIN = 0x0000, LENGTH = 0x0042
  rom    (rx)  : ORIGIN = 0xc000, LENGTH = 0x2000
  eeprom (rx)  : ORIGIN = 0xb600, LENGTH = 0x0200
}

/* Setup the stack on the top of the internal RAM.*/
PROVIDE (_stack = 0x0041);
To run the program on the EVBPlus2 board you have to make the following changes (shown in bold) in the 7SegmentsDisplay.c program.
void wait() {
	volatile unsigned short int i;
	for (i=0; i<50000; ++i)
		/*empty*/;
}

int main() {
	unsigned short int count;
	// select display
	volatile unsigned char* portd=(unsigned char*)0x1008;
	volatile unsigned char* ddrd=(unsigned char*)0x1009;
	*ddrd=0x3c;
	*portd=0x3b;
You have to Build the program again after you made the changes in demo.ld and 7SegmentsDisplay.c (open the 7SegmentsDisplay.c program in SciTE and press F7). You can load the program by pressing F5 in SciTE. When you load this program into the DEMO version of THRSim11 you get warnings because there is no memory available in the DEMO version of the simulator to load this program. Just press Stop. You will not be able to simulate this program but you will be able to download it to your target board.
You can use the Target, Target Communication Options menu item to select the serial port were you target board is connected to. You can use the Target, Target Download... menu item to download the program to your target board. The Target C/C++ List window is openend automatically when the download succeeds.
The Target C/C++ List window has almost the same features as the non-target C/C++ List window but is controlled by other buttons/key combinations. These are the features:
 Run (Ctrl+F9)
 Step (Ctrl+F7)
 Run until the selected
line is reached (Ctrl+F4)
Run until the selected
line is reached (Ctrl+F4)
 Run from an address you supply
(Ctrl+F6)
Run from an address you supply
(Ctrl+F6)
 Stop running (Ctrl+F2)
Here is a picture showing the program running on a EVBPlus2 board:
Target C/C++ Variables Window.You can use the Target, Target High Level Language Variables menu item to open this window. The Target C/C++ Variables window as almost the same features as the non-target C/C++ Variables window. These are the differences:
|
 |